
s o f t
o p e n i n g

s o f t
o p e n i n g

Hello, hello, hello. It feels like it has been some time since I’ve sat still to write a blog post. I actually panicked internally when I realized just how fast June was passing by!
Despite only being halfway through, I think we can all agree that 2020 is an impactful year. It’s extremely difficult to summarize all the past and current 2020 events, but generally, all have seen disruptful changes that has forced people to re-examine the status quo.
*I also recognize that there are pressing international issues such as in Yemen, Poland, Hong Kong, and Palestine.
In my personal life, 2020 has presented endless obstacles on top of the usual ones expected post-grad. After obtaining my B.A in December, I moved back home with my parents and tried to find my first big-girl job in the real world while trying to form some coherent life plans. The job search proved much more difficult than anticipated.
Things I wish I knew before graduating:
Just when I thought I secured my first decent job, COVID-19 hit and my offer was rescinded on my supposed “first day of work.” It was a tough time-period and I wouldn’t wish the experience on anyone. I allowed myself to mope for a bit before gradually picking myself up but life would never be the same. Reality was hitting everyone hard.
Truthfully, I never thought that I would bring social and political issues onto my Instagram and blog since my initial vision was to foster a place of inspiration, positivity, and perhaps even of rest from the anxieties of the real world. Social and political issues hardly sparks happiness; however, 2020 has made rethink and call into question the use of my knowledge if I don’t do anything with it.
It’s been months now and while at home, I’ve been thinking more about my university discourses. I was a Communication Major and minored in Ethnic Studies briefly, so the current BLM movement exposing systemic oppression hit a lot of the topics I spent countless hours mulling over during undergrad.
With the knowledge that I already had, the movement’s voices became impossible to ignore and because I know very well of the importance of media’s application, I was convinced that not using my social platforms would be a moral crime. And thus…the “not so fun” COVID and BLM topics have made it into this recipe blog as well and I won’t apologize for it.

Anyways, during quarantine, I, alongside many of my foodie peers, have been baking a lot. Especially bread. But while it seemed that most people were caught up on making Sourdough bread, I was making Milk Bread by Kirby’s Cravings, who was inspired by Christine’s Recipes!
Use 1 beaten Egg White to brush the tops of the bread before baking. Bake at 325°F for 30 minutes or until golden brown.


Shout out to my friends “Chef Ramsey’s Right Hand Pan,” “All Might,” and “Chickpea” for helping me come up with a title!
Names suggested: tarts de la custard ubé, sesame street tarts, ube custard me me tarts, and ube bae bae.
If you’re unfamiliar with ube, it’s a yam that’s purple on the inside but a lot sweeter than your average yam! Some people mistake it for taro, but taro, while also delicious, is not a yam to say the least.
Ube is also known for its rich purple color and while taro can also be purple (or white), it’s a lighter shade than ube. Because of it’s intense purple color, ube-flavored foods like breads or lattes are visually captivating.
A beautiful drink that’ll fill you up and keep you warm ❤
Around 2015 in California, ube sweets were trending in California and prompted many ube-oriented sweets shops to open in LA. Although I live in a suburb of LA, I’ve never had the opportunity to visit one of these stores.
Flash forward five years, and having the time, motivation, and adequate knowledge, I decided to create my own ube treat instead of making the trip to LA (not that I could during the quarantine anyways). I decided on a tart theme.
Initially, I imagined making an ube cheese tart or ube mochi tart. Unfortunately, I didn’t have cream cheese on hand to make a cheese tart and while I was very tempted to make a mochi tart, I wasn’t sure how successful my endeavor would be. Thus, I settled with a custard tart.
There was one small problem with making tarts — I didn’t have tart tins so I had to use cupcake tins and a 5-inch cookie cutter. You’ll soon see that it turned out to be hardly a problem at all.

I cut some parchment paper rounds to line the bottom of the tins, but I found that it would probably be fine without since there’s so much butter in the dough.
Since I wasn’t too confident in making a tart shell, I did a small batch of tart shells first as a trial run though. For the sake of science, here were the ingredients I used:

Crust was too thick at a quarter inch!
The result was a tart that was kind of chewy but also kind of dry. I think it tasted dry because I didn’t roll out the dough as thin as I should’ve. Regardless of the thickness, I felt that this wasn’t the kind of crust that I wanted. I envisioned something more crisp and delicate, not chewy.
After I eating the tarts with the ube custard, I also felt that there was a certain depth missing. I started to think that adding black sesame’s earthy and aromatic flavor profile might help…so I did just that for trial #2.

Except that while I usually have plain black sesame powder on hand, I didn’t this time. I did have instant black sesame powder paste though — the kind that makes instant black sesame dessert soup. I decided to use it anyways because it claimed that it was low sugar anyways, so I took a chance that it would work.
If you use plain black sesame powder (not for instant dessert soup), try substituting with roughly 6 Tbsp black sesame powder and 1 Tbsp sugar.
Anyways, I modified the first tart recipe as follows:

I couldn’t be happier with this trial’s results! The pastry was delicate yet crisp, and the black sesame perfectly complemented the ube custard and brought out a “natural” ube flavor.
On another note, I’m so glad that the ube custard set after baking. It was one of my main concerns going into this project but it turned out alright the first time around so I focused on the tart shells instead.

Without further ado, here are the recipes for the ube custard and black sesame tarts:

Have you ever been to Medieval Times? If you haven’t or have never heard of it, it is a dinner theater with live jousting knights while you eat your “medieval” chicken dinner. My parents had taken the family to dine there once when I was a kid and while the knights and castle were cool, my fondest memory of that place was the tomato soup.
Admittedly, I didn’t have tomato soup very often growing up, but I always appreciated the homey aspect of it; as such, it is a soup that is close to my heart regardless. That said, the Medieval Times tomato soup was THE best tomato soup I had ever tasted and that fact holds true even to this day. So, it is no surprise that I had the urge to recreate it.

This particular tomato soup is thick and creamy with small bits of vegetables in it for texture. If I had known that there were onions in this soup as a kid, I probably would’ve refused to drink it, but since the food was served in the dark, I couldn’t tell. In fact, I had thought that the small chunks were ground meat or mushrooms.
The secret to this “meaty,” rich flavor is actually browning or caramelizing the vegetables before pouring in chicken stock.

Making this soup actually made me curious about medieval food- how accurate was Medieval Time’s depiction of the real medieval times? My curiosity led me to binge-watch a bunch of YouTube videos on medieval life. While I never found enough information to conclude whether this soup is true to the period, I did learn four medieval “fun” facts:

For whatever reason, tomato paste comes in a large can even when the majority of recipes only ask for a couple tablespoons … or maybe only one. What do you do with the remaining paste? How should you store it so it’ll last longer? Fortunately, there is a way to store tomato paste so that…
Anywho, after browning the vegetables, flour and tomato paste are added. As it cooks, you’ll start to notice that brown stuff will stick to the bottom of the pan. My mother would freak out if she saw this, believing that it’ll cause cancer and would need to be painfully scrubbed away later. I’m no expert on cancer so I can’t say much about that, but as someone who watches a lot of cooking shows, I can say that this brown stuff is GOOD stuff at least to the palate. All the flavor is collected there.
When the broth is added, I scrape away the bottom bits and combine it into the soup so that it absorbs all the flavor. Scraping it also means that the pan won’t need to be scrubbed contrary to my mom’s expectations. You’ll also find that the bottom bits come off easily- no workout here.

After the soup had been boiled, simmered, and cooled to a reasonable temperature to be handled, I blend roughly half of the soup in my trusty blender, no more than 2 cups at a time. I don’t own an immersion blender, but if you do, lucky you- I’m sure this step would be much more efficient!
The original Medieval Times soup was creamy with some bits of vegetables in it which is why I only blend half the soup, but if you’d prefer to have an entirely creamy soup with zero chunks, blend the whole soup. Alternatively, if you’re not a fan of creamy soup, don’t put it through a blender at all. I’m sure both variations would still taste great because this is a great soup!
As for fellow vegetarians and vegans, feel free to swap butter and chicken stock with substitutes and let me know how it goes. I hope you all enjoy this soup as much as my family and I did ❤

Do you ever just have leftover kale…maybe from making Kale and Butternut Squash Orecchiette?
Shameless plug aside, I’m honestly not the biggest fan of kale. I know that my previous statement is contradictory since I now have two published recipes with kale as a main ingredient- but, you have to admit that when kale is stir-fried with garlic and other veggies, it transforms into savory goodness. If you’ve yet to experience the formidable flavor pairing that is kale and garlic, I commend you to try out this recipe!
I think that the key to making kale appetizing is to de-stem it. I once bought bagged kale on accident and was appalled to find that kale from the bag came with their stems on. Some people do eat kale with the stems, but I can’t seem to bring myself to enjoy the stem part even after pan-frying it with heaps of garlic.
Since finding ways to make kale taste good, kale has become a staple in my fridge. I’m also glad that it’s a pretty cheap vegetable at 99¢a bunch during the spring and summer. Somehow, its presence in the fridge is also a reminder to feed my body healthier food.
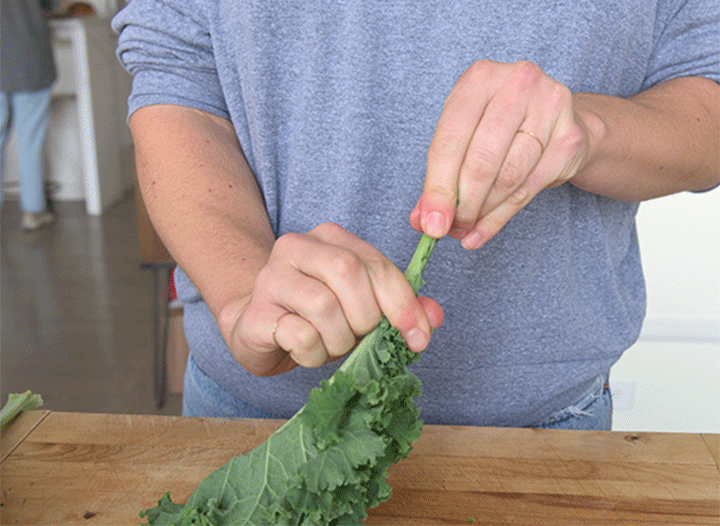
Be sure to thoroughly wash and de-stem your kale leaves. You can either use a knife to cut around the stem, or slide the leafy part off like so:
I love this breakfast idea because it’s hearty and healthy. So, if I have time and leftover kale, chances are, I’ll be making this for brunch. Plus, it’s a breakfast idea that doesn’t have spinach for once. Nothing against spinach, but variety is very welcome in my kitchen. Then again, if you would like to substitute kale for spinach, go for it. Speaking of substitutions, sweet potato hash instead of potato would also be yummy too.

Whatever your choice of starch, be sure to rinse the chopped cubes in a bowl of water a couple times to remove the starch on the outside. Then, pat dry the cubes as much as possible. Removing the starch and drying them will help the cubes fry up faster and more evenly.
After cooking, I recommend serving it in a big bowl fit for a hearty meal. I love my breakfasts in bowls because it makes it easy to consume by the spoonful- real classy, I know- but such a simple thing makes me feel so free and happy. So, I’m going to recommend that you serve this in a bowl too. Thank me later.
Oh, crepe! You mean I can make fancy flat pancakes in my own kitchen? In-crepe-able~
While I was writing this updated recipe and looking over the old version, I got a bit emotional at the note I had written at the bottom of the old recipe.
I initially published this recipe on March 17, 2019, almost a complete year ago. I had written that I was proud of how far I had come since the thought of making a cooking blog back in November 2017. Now, in February 2020, I’m in disbelief that blogging has been with me for this long, granted I wasn’t regularly updating until January 2019 when I moved the blog here on WordPress. Regardless, I am still proud of myself for sticking with this blogging thing.
In the old post, I also wrote about starting an Instagram account. Not to keep tooting my own horn, but yeah, I did that and I’m doing pretty good!
Once again, I am so thankful for my friends, family, and other online supporters that continue to motivate me to keep going!

As always, let me know if you’ve tried out this recipe! I’d love to know how it goes.

My parents hauled stacks of Korean seaweed home from their trip in Korea!

I have yet to try all three flavors yet, but they are certainly tasty! I would eat them by themselves or with plain rice, and yet, it still seemed like we had an endless supply of seaweed. I felt bad for the older seaweed in the pantry that would mostly likely continue to be neglected in favor of the newer products…so I decided to make kimbap with both the old and new seaweeds.
It’s not really right to call this a recipe since everything is so customizable, but I’ll try to give some pointers!
A faster and healthier recipe for japchae!
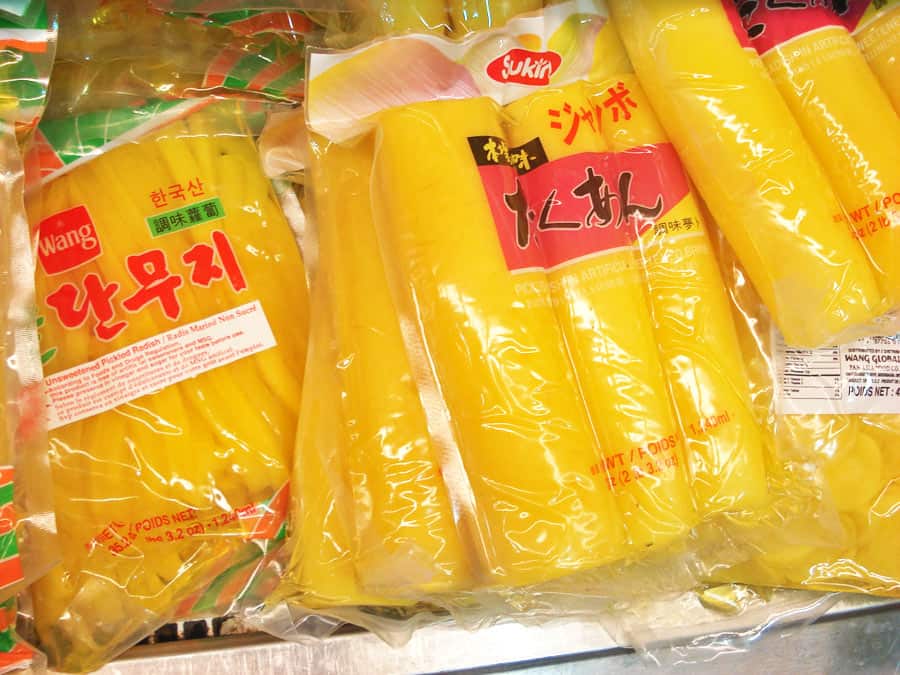
Most kimbap includes meat and vegetables. The meat could be anywhere from expensive marinated beef or mystery spam. Vegetables could also be whatever is available, but almost every kimbap has danmuji, or pickled radish, within the mix. Ideally, kimbap is colorful, so the vegetable choices reflect that, but I wouldn’t say that you must make kimbap colorful if you don’t care or can’t afford to.
I’m not vegetarian, but I’m averse to cooking raw meat and am not fond of canned meat, so I opted for imitation crab and fried egg for my “meat” choices. Some other vegetarian options could also be marinated tofu or tempeh, or you can choose to opt out of “meat” entirely.
For my veggies, I chose to use: spinach, cucumber, carrot, and kimchi, and danmuji. I don’t think kimchi is common in kimbap, but I thought that I would add it in to complement the pickly-sour taste of the danmuji.
Again, you patrol what you put in your roll. So, stick to ingredients you’re comfortable with! That is the beauty of customizable kimbap!
I cooked about one cup of rice for about 3 rolls. After the rice was done, I mixed in some salt, sesame oil, and a little bit of rice vinegar for flavor. Then, I set it aside to cool to room temperature. Meanwhile, I was chopping and slicing all the ingredients into strips.

I used a bamboo mat to shape my kimbap rolls. Using a bamboo mat helps make the wraps as tight as possible without squishing it too much, but it’s possible to make rolls without it using plastic or cling wrap. It might be slightly more difficult to control though.
Over a stovetop on medium-flame, I quickly swiped my plain seaweed sheets across a couple times to “roast” it. I left the seasoned seaweed as is.
On the bamboo mat, I placed a sheet of plain, now roasted, seaweed flat, shiny side down. I covered the non-shiny side of the seaweed sparsely with rice. You really don’t need a lot of rice. There could be tiny gaps of rice, but I promise it’ll be fine! The hardest thing about kimbap or sushi is avoiding adding too much rice. I wet my fingertips with water before spreading the rice around. The water prevents the rice from sticking to your fingers.
Afterwards, I arrange the fillings horizontally, about 3 inches away from the edge facing you, in no particular order. Then, I lift the edge of the bamboo mat nearest me and try my best to cover all the ingredients. Squeeze everything together gently, and put the bamboo mat back down. The seaweed, rice, and kimbap fillings should stick together. Proceed to continue rolling the rest of the rice/seaweed flap. Then, use the bamboo mat to squeeze everything into a roll-shape again. Repeat with remaining rolls and ingredients.
I realize it’s difficult to explain “how to roll” without visuals (I couldn’t take pictures with dirty hands), so here’s a helpful video from my favorite Korean homecook that I’ve learned lot from:
This step is optional, but I like to brush some sesame oil on the outside rolls before cutting them up.

I do think that the kimbap using seasoned seaweed had that extra flavor punch that made it slightly better than plain seaweed, but I think as long as you season the fillings well, it should make up for the lack of flavor outside. I made the mistake of undersalting the rice and fried egg, so my kimbap was pretty plain, but still delicious!


